I made a micro.blog plugin for Neovim
What’s stopping you from publishing to your blog more? Is your boring life giving you nothing to write about? Demotivated by the chronic lack of engagement your posts have been getting? What about that crippling self-consciousness and perfectionism manifesting in dozens of “unfinished” drafts? Of course not — we all know it’s the friction of having to take 15 seconds to copy your post from your favourite text editor into the micro.blog window and clicking publish (probably even using the mouse, ugh).
Thankfully, I’ve made a Neovim plugin (really, a curl wrapper wrapper) to create and update micro.blog posts with just a couple of keybinds of your choosing.
Isn’t Neovim for coding? Why would you use it for blog posts?
Vim’s motions (keyboard shortcuts that are used to navigate and select text) are good for all editing tasks, not just source code. For example, to select a sentence, including the full-stop and following whitespace, place the cursor anywhere in the sentence and type vas ("Visually select Around Sentence"). Similar commands exist to select/delete/change words, paragraphs, text in brackets, up to a comma, in quotation marks, etc. It’s also easy to configure tools like spellchecking, dictionary, and thesaurus in Neovim.
Other popular text editors (including Obsidian) often implement a “vim mode” to emulate a subset of Vim’s shortcuts. If you’ve never tried learning these, I highly recommend giving it a go — the learning curve is steep but it’s fun, and you’ll never want to use the mouse or hold down modifiers to edit text again.
Neovim loads virtually instantly. Even with over 80 plugins installed, my startup time is around 200ms1. With just a couple of keyboard shortcuts I can go from having a shitty half-formed opinion to having published it on the open web in just a few seconds.
The plugin
The plugin is based around just four main commands. publish (used to both create and update posts), quickpost (which is like publish with some default settings for “micro” posts), and two commands for opening a post to edit and update. First, let’s look at getting set up.
Configuration and installation
You need to have curl installed, as well as the Neovim plugins telescope and plenary. You can pass the following table to the lazy plugin manager:
{
    's-cassidy/microblog.nvim',
    dependencies = {
        'nvim-telescope/telescope.nvim',
        'nvim-lua/plenary.nvim'
    }
}
Next you need a micro.blog App Token, which you can get from the Account Settings page. This needs to be set as an environment variable (default MB_APP_TOKEN). As shell processes only have access to variables defined when they start, you need to set this before starting Neovim (there’s a configuration option to warn you if the plugin starts without setting the App Token).
The only bit of configuration that is absolutely essential is a Lua table containing your blogs. Each entry is a table with your blog’s url and uid (probably https://something.micro.blog). You’ll also probably want to set some keybindings. Here is what my configuration looks like in the lazy table
      local mb = require('microblog')

      mb.setup({
          blogs = {
            {
              url = 'https://samjc.me',
              uid = 'https://samjc.micro.blog'
            },
            {
              url = 'https://samjc-test.micro.blog',
              uid = 'https://samjc-test.micro.blog'
            }
          },
          no_save_quickpost = true,
        })

      vim.keymap.set({ 'n', 'v' }, '<leader>me', mb.pick_post, { desc = 'Edit a post' })
      vim.keymap.set({ 'n', 'v' }, '<leader>mp', mb.publish, { desc = 'Send a post' })
      vim.keymap.set({ 'n', 'v' }, '<leader>mq', mb.quickpost, { desc = 'Quick post' })
      vim.keymap.set({ 'n', 'v' }, '<leader>mu', mb.get_post_from_url, { desc = 'Open micro.blog url' })
      vim.keymap.set({ 'n', 'v' }, '<leader>ms', mb.display_post_status,
        { desc = 'Display post status' })
Some other configuration options:
no_save_quickpostwill let you quit without saving if you used thequickpostcommand. Sincequickpostis designed for sending short “micro” posts, you can set this totrueif you don’t care about keeping a local copy of your micro posts.always_input_urlwhen set to true will always give you the option to manually edit theurlof the post you are updating. Most users will want this set tofalse, because you’ll use one buffer per post, so the target url for apublisheither won’t exist (brand new post) or it will be the existing url of the post in that buffer. However, some workflows might benefit from this (multiple posts in a single file, for example).
Using the plugin
The simplest usage is to make a new post. We open a new Neovim buffer, type out our post, and then run either publish (which will prompt the user to pick which blog to post to and input some options like a post title and categories) or quickpost, which skips the prompting and just posts to the default blog with no title or categories. We can also visually select some text and run either command to only post that part.
To edit an existing post, we can use edit_post_from_url which will prompt for an url (or takes an url as an argument) and then open that post in a new buffer. You can then make your changes and run publish to publish your updated version.
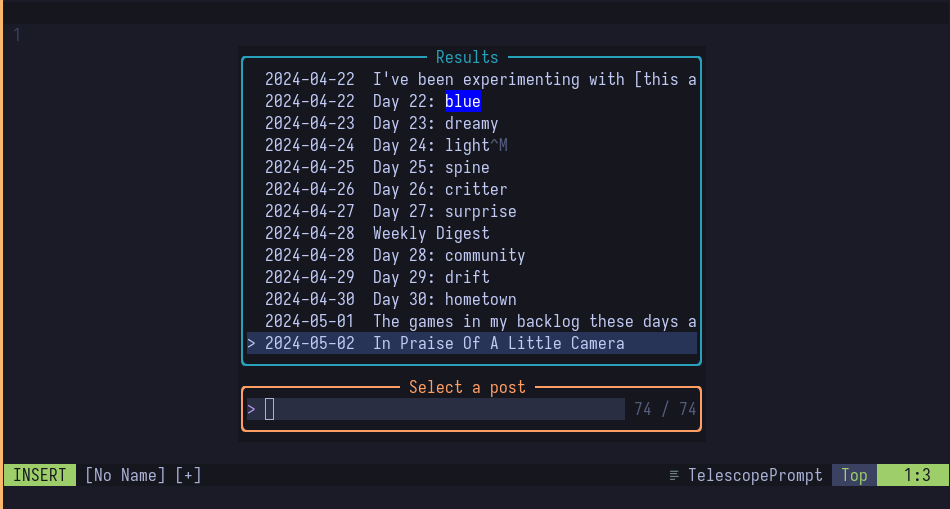
Alternatively, pick_post will load a large (full?) list of posts in telescope that you can fuzzy search. The search includes the date, title, content, and even url of the post. I’ve not yet got around to a previewer for pick_post, so it’s slightly dependent on you being able to recognise a post by its title or first sentence, but I imagine I’ll add a previewer soon. You can then pick a post to open and edit as described above.

Thanks
Thanks to HeyLoura — it was very useful to be able to read Lillihub’s source code to see examples of the micropub protocol in action. And thanks to you for reading and showing an interest; I’m not a developer and this is my first attempt at a plugin. If you give this a go and find bugs, please do open an issue or PR, drop me an email, whatever.
-
About a fifth of this start-up time is
obsidian.nvim↩︎